

How-to
Create Data Connection:
Database
Previously: How-to Create Data Connection.
This section helps with a database-specific creating data connection.
Datayeet supports several common database types:
- PostgreSQL,
- MySQL,
- MS SQL Server,
- Oracle DB.
These DBs have common input requirements.
By selecting one of the DB connections, the section of the dialog window with database-specific inputs will become visible.
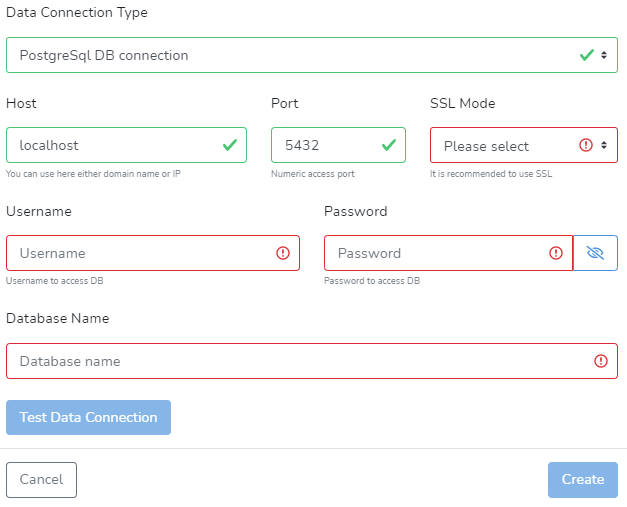
The create the data connection, the user will need to provide the following information:
- Host input field requires either the domain name or IP address of the server with the database and Port to which the database is listening.
- It is important to select the correct SSL (TSL) Mode. Secure connection should be always a preference.
- Username and Password required to access the database with the Database name. The user can view the typed password by clicking on the eye icon next to the Password input field.
The user should consult with the DB administrator to learn about best security practices and credentials for this section. It is recommended to use purposely created credentials for the DataYeet platform with strict restrictions to delete, insert, and access sensitive information.
For Oracle DB - DataYeet currently does not support secure mode.
Test Data Connection button allows users to test connectivity to the database. If all information was correctly entered and the connection test was successful, a green box that says "The connection was successful" will appear in the bottom right of your screen.

Additionally, the results of the connection test will appear next to the Test Data Connection button. It will say whether the connection was successful, the timestamp of the test, and, if available, the information on the cipher used to encrypt the connection. It is followed by the count of visible tables to the user.
If there are any issues with the data connection - an orange box will tell you what was filled in wrong.

Once the data connection passes the test - the Create button will be enabled. Click it to create and save the connection.
When the data connection is created, the user is redirected to the data connection section containing a list of all available data connections.
Next is How-to Manage Data Connection.